
Zero Downtime Deployment with AWS Elastic Beanstalk and CodePipeline
Deploy your Dockerized application across a fleet of EC2 instances using AWS Elastic Beanstalk's zero-downtime rolling deployment.

AWS Elastic Beanstalk is an easy to use service that lets you deploy your applications without having to deal with infrastructure configuration. I use Elastic Beanstalk to deploy Docker containers backed by Elastic Container Service. You can choose which EB deployment method fits your needs best.
Elastic Beanstalk Deployment Methods
| Method | Deploy Time | Zero Downtime | Rollback Process | Code Deployed To | Impact of Failed Deployment |
|---|---|---|---|---|---|
| All at Once ✦ | 🕑 | ❌ | Re-Deploy | Existing Instances | Downtime |
| Rolling | 🕑🕑♦ | ✅ | Re-Deploy | Existing Instances | Single batch out of service. Any prior successful batches running new code |
| Rolling + add'l Batch | 🕑🕑🕑♦ | ✅ | Re-Deploy | New and Existing Instances | Minimal if first batch fails, otherwise similar to Rolling |
| Immutable ✦ | 🕑🕑🕑🕑 | ✅ | Re-Deploy | New Instances | Minimal |
| Blue/Green | 🕑🕑🕑🕑🕑 | ✅ | Swap URL | New Instances | Minimal |
✦ Options available for both Single Instance and Load Balance/Auto-Scaled Environments
♦ Varies depending on instance batch size
In this showcase, we are going to use the "Rolling" deployment method using 2 EC2 instances with a batch size of 1.
Note the relatively lower deploy time of "Rolling" because it uses existing instances. On the other extreme, "Blue/Green" deployments take the longest but have the least impact during a failed deployment. With exception of "All at Once", the rest provide zero-downtime deployments.
Overview of the Services
Here's the list of services you will be using, I'll go into more detail below.
- AWS Elastic Beanstalk
- Amazon RDS for Postgres
- AWS CodeCommit
- AWS CodeBuild
- AWS CodePipeline
- Amazon ECS (Container Service)
- Amazon ECR (Container Registry)
- Amazon VPC, S3 and IAM
Amazon RDS
Amazon's managed database service is fantastic and although this post is on zero-downtime deployment, database migrations in a ZDT fashion are awfully hard and the strategy depends on your requirements and constraints. I've included it in the showcase, but migrations are on you, sorry.
CodeCommit
AWS CodeCommit, as the name implies, is a code repository service and we'll be using it with Git. It will require an IAM user and SSH key pair as it is the preferred way to manage access to the repository.
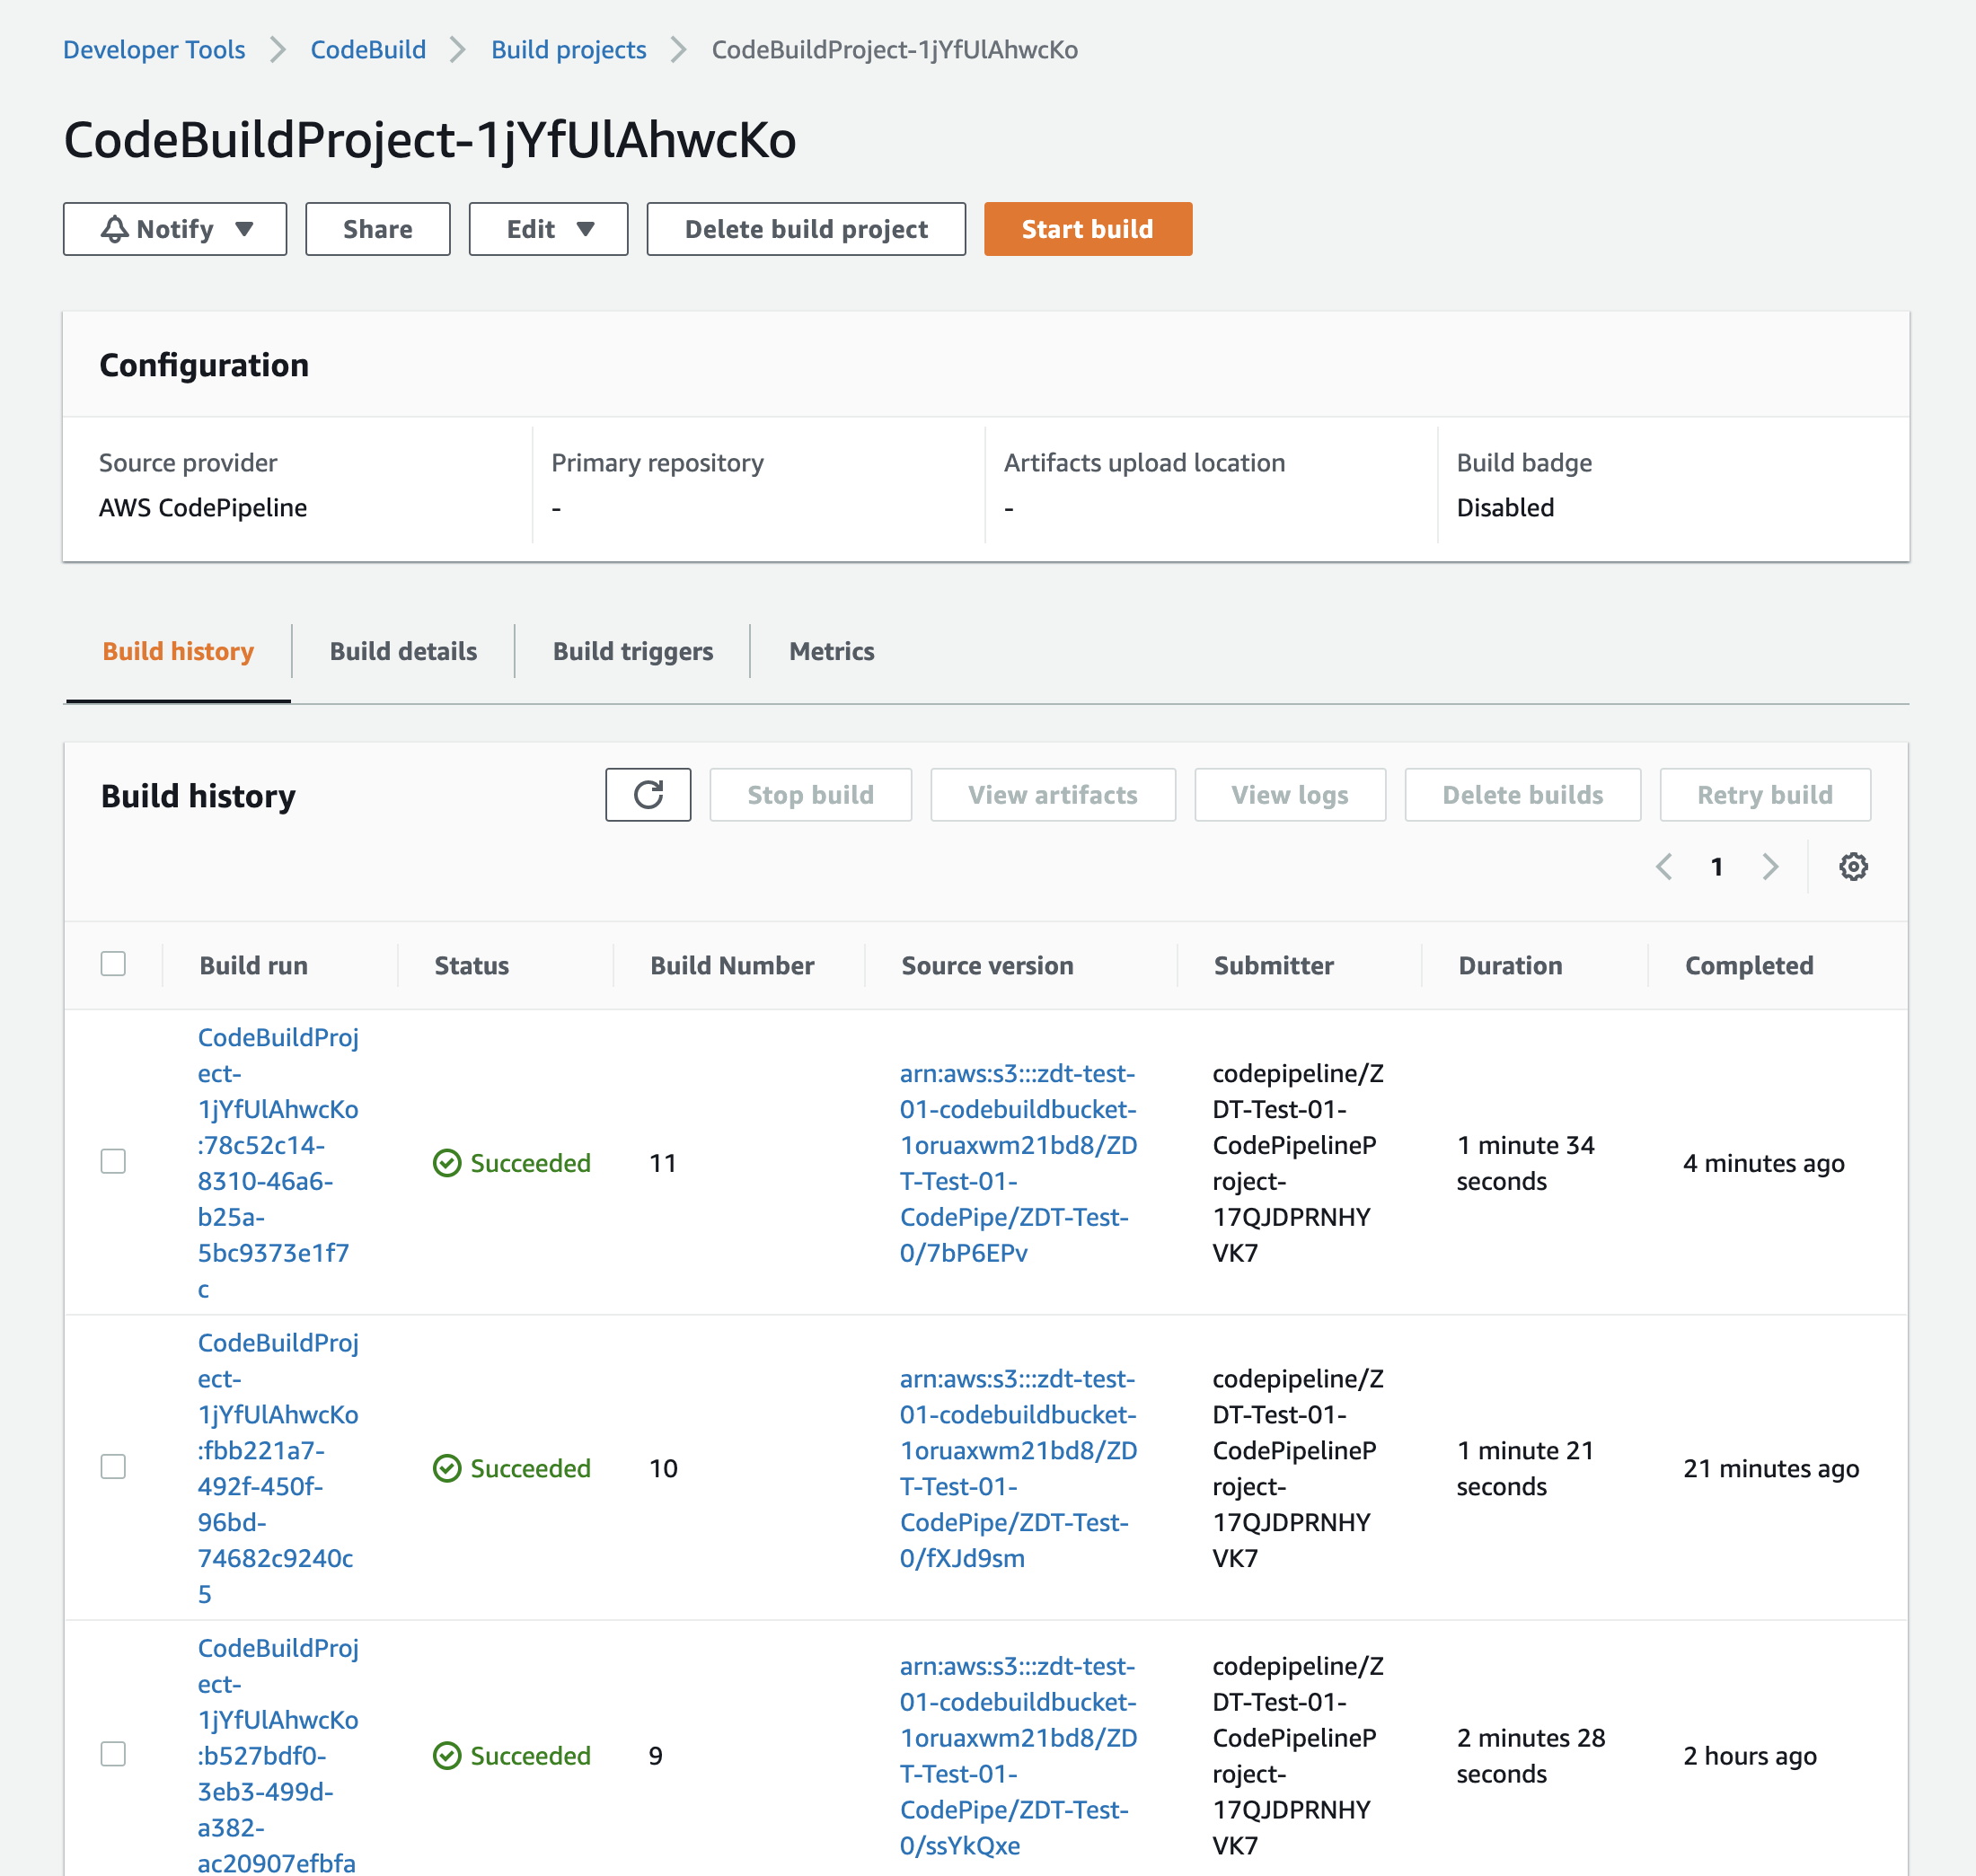
CodeBuild
AWS CodeBuild is essentially a managed Jenkins service. It will build your container, run your tests and produce an artifact that will later be used during deployment.
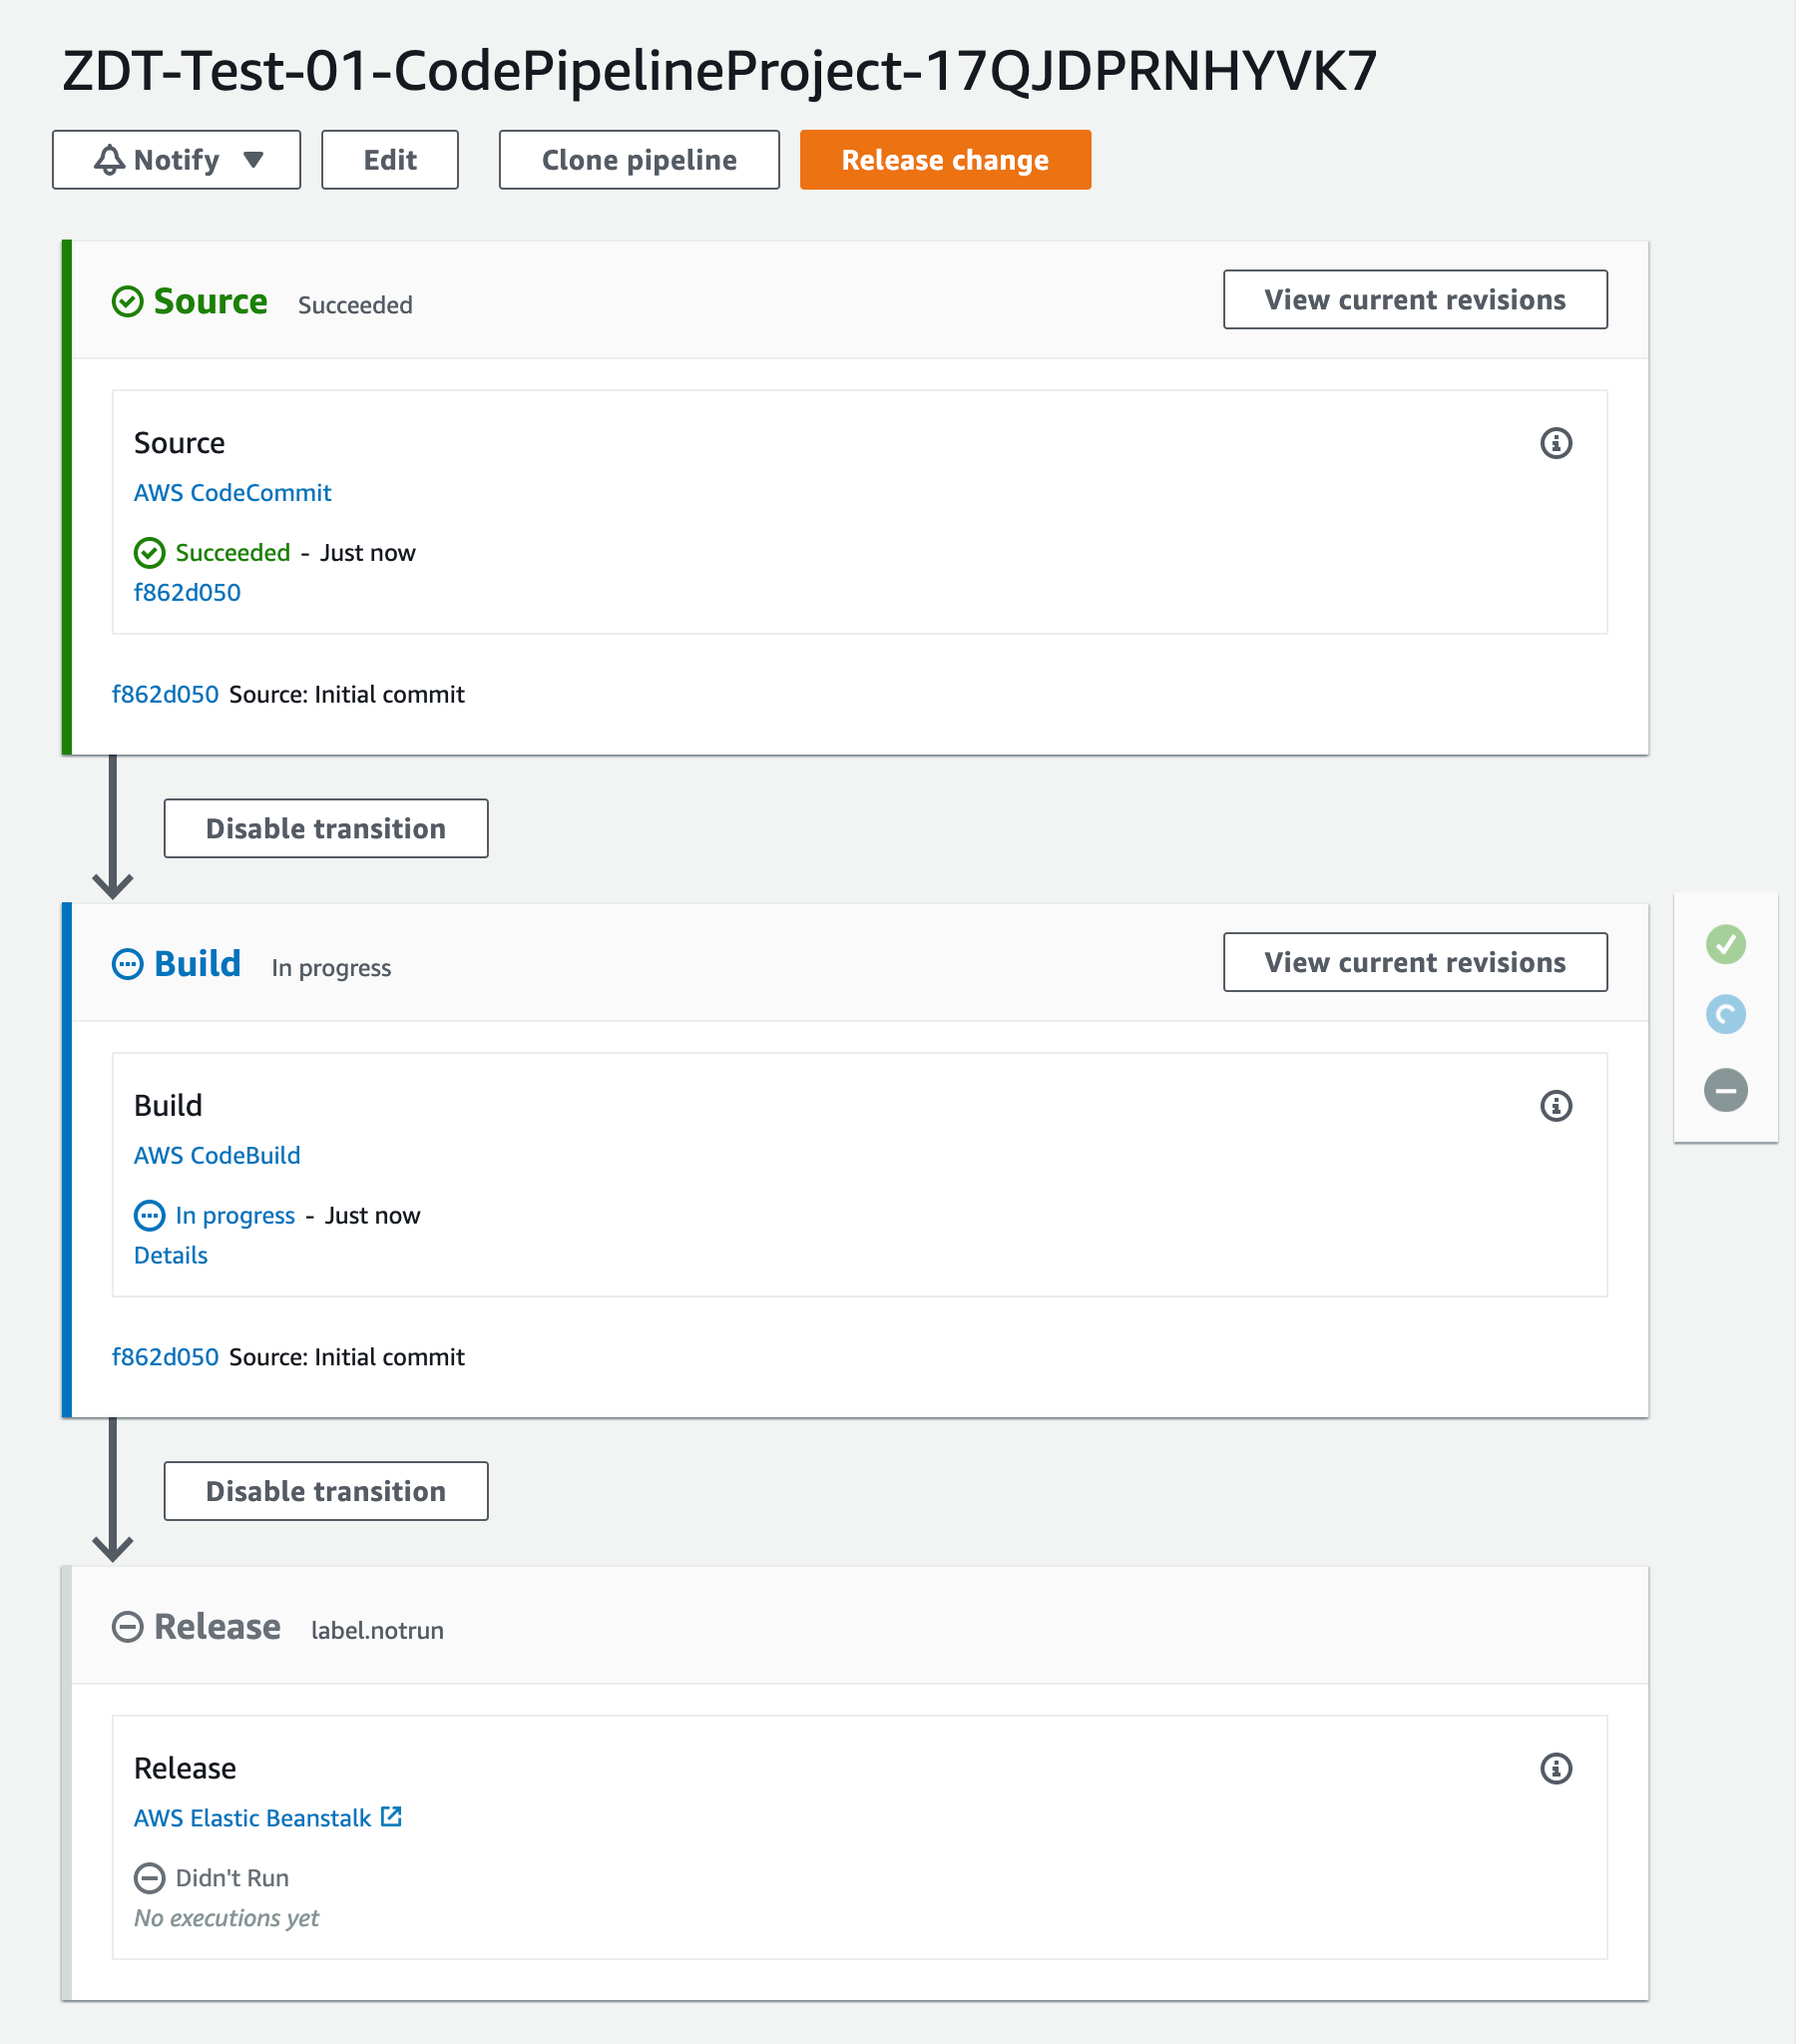
CodePipeline
AWS CodePipeline is a continuous delivery service that will manage the release cycle, from new commits to build and through deployment in Elastic Beanstalk. This showcase just scratches the surface of what's possible with CodePipeline.
Amazon Container Service and Registry
The Elastic Beanstalk application will use ECS and ECR under the hood. There is no extra configuration needed for this. Elastic Beanstalk will pull the latest image from ECR and use ECS to deploy the containers. The EC2 instances, load balancer and DNS settings are managed entirely by Elastic Beanstalk.

Amazon S3, VPC and IAM
General familiarity with these is enough, you will just need take one extra step with IAM when setting up access to the CodeCommit repository.
Launch the Showcase
Click the deep-link below go to CloudFormation with the template ready to go.

Notes on the Setup
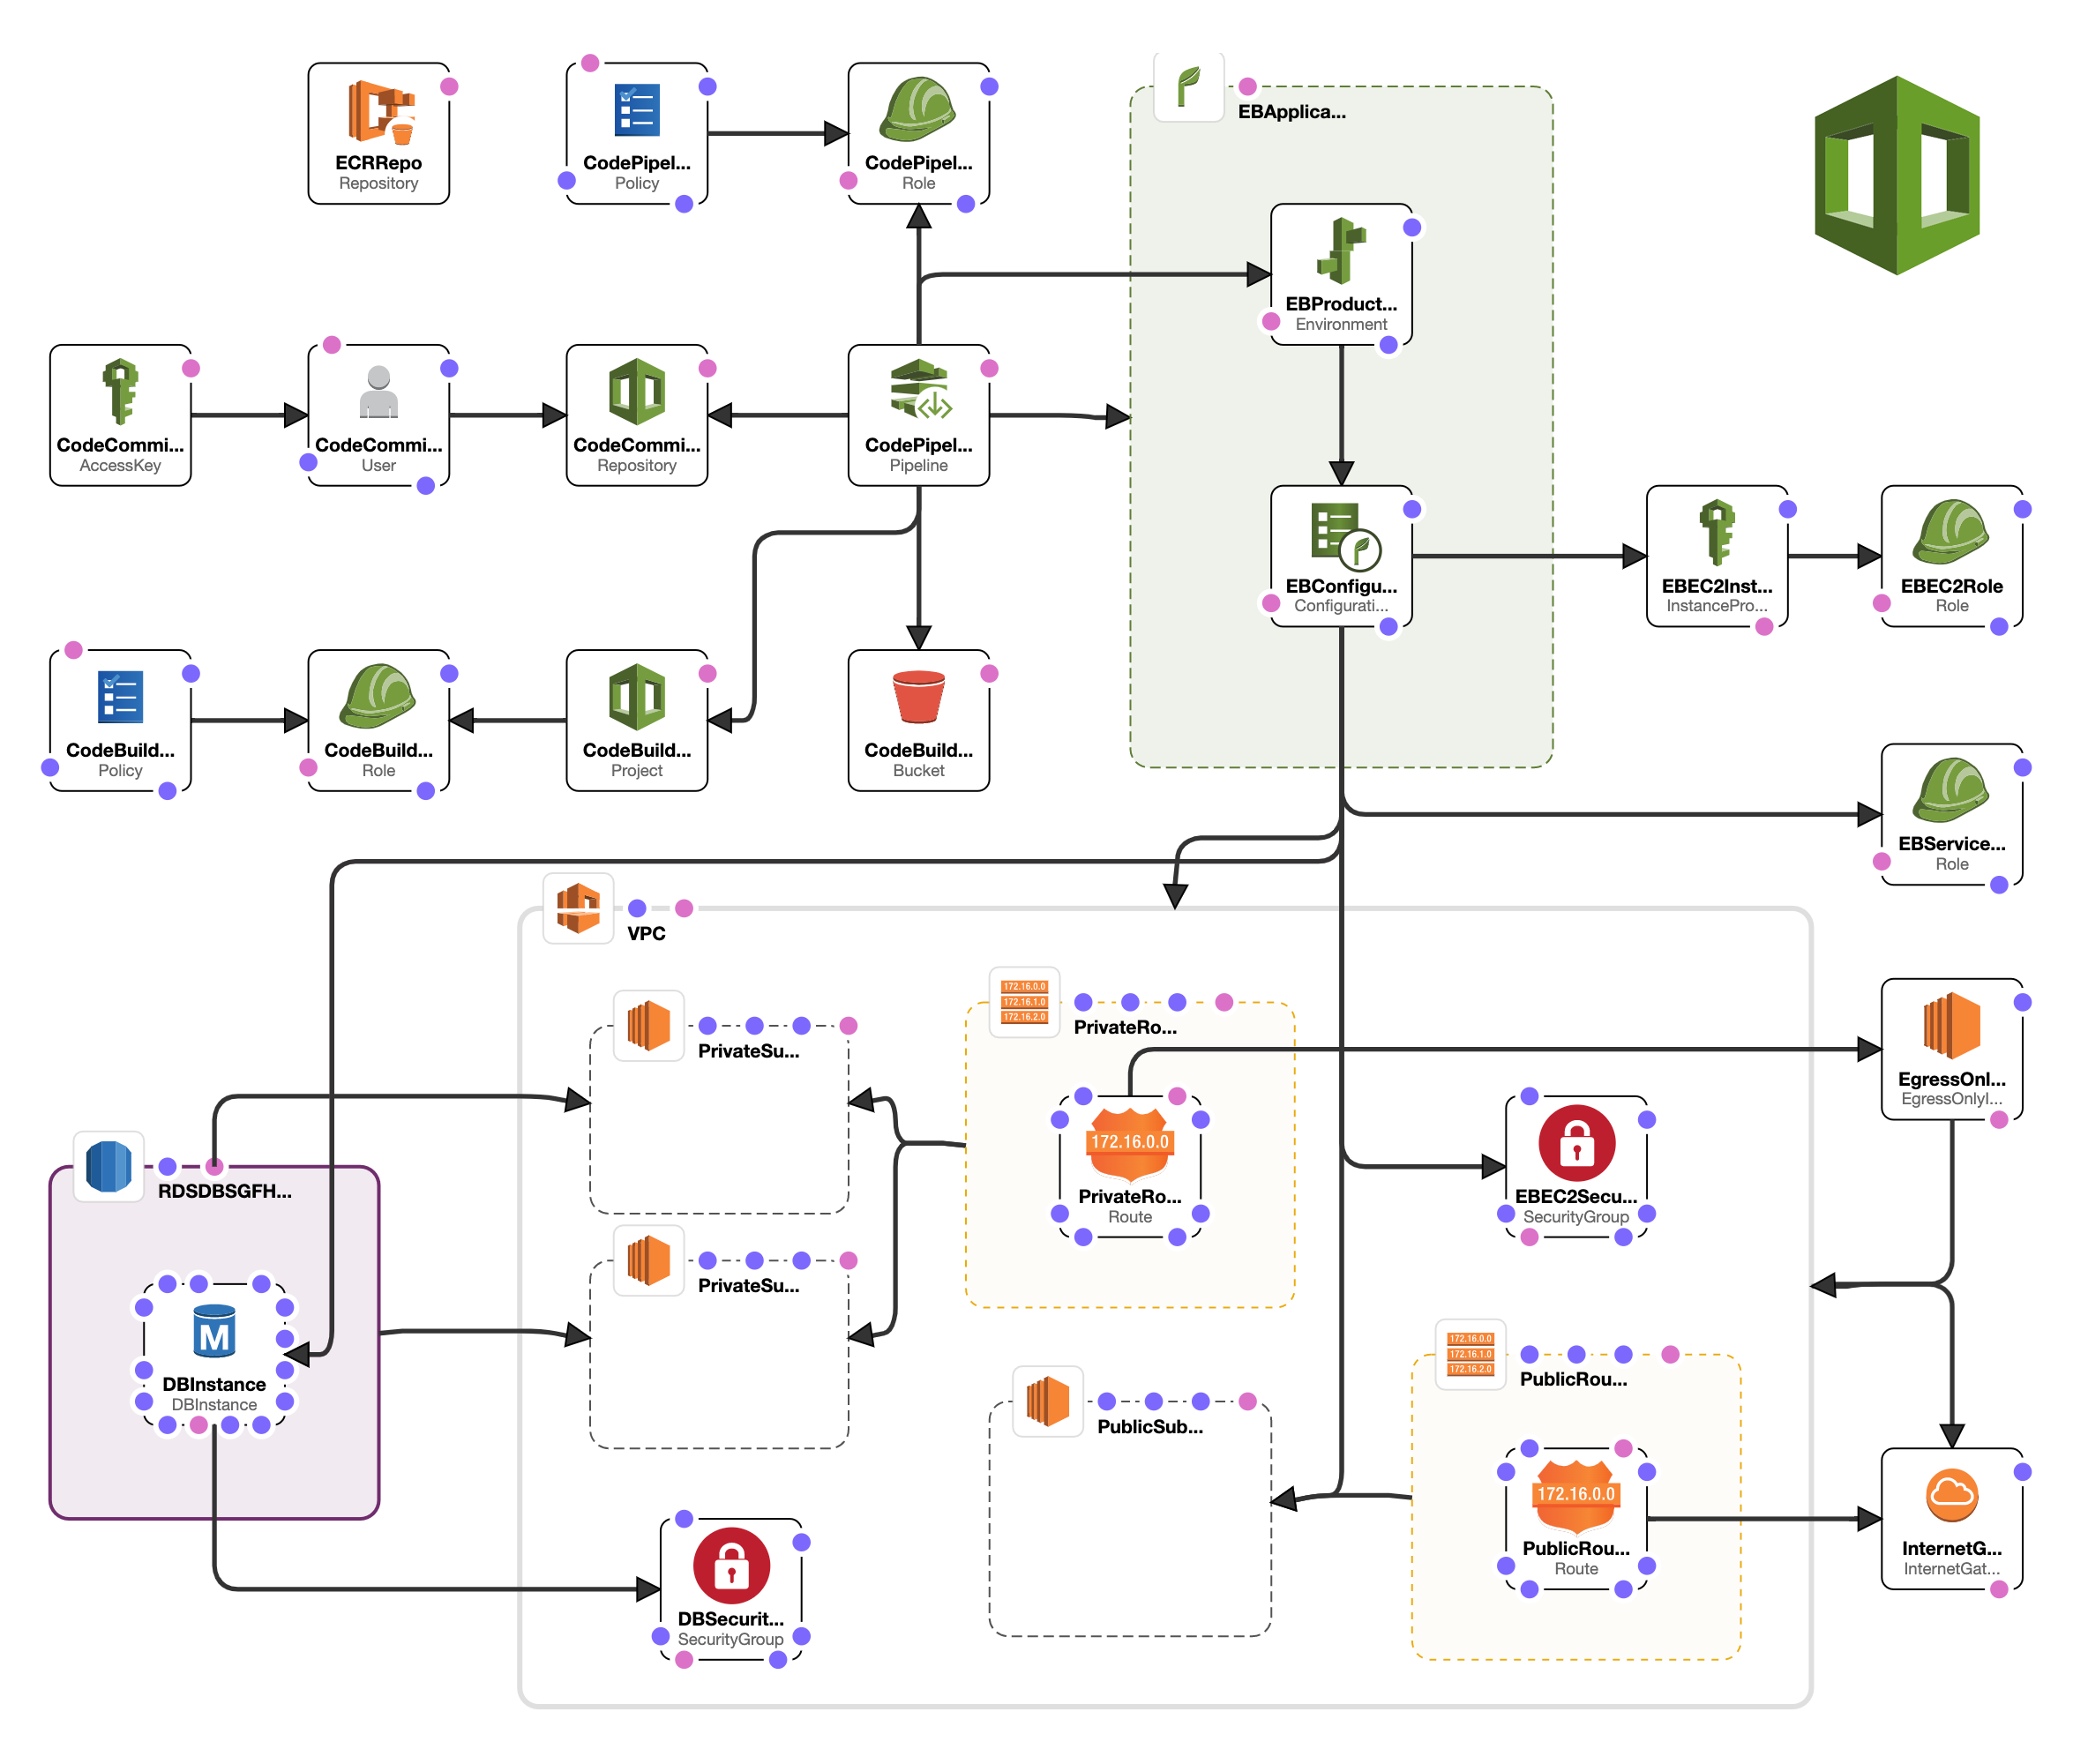
Refer do the diagram above:
- The public subnet is where your web servers will live.
- The private subnets are for the database. If using MultiAZ configuration, both will be used.
- The private subnets are of course, not publicly accessible. The database will only accept incoming connections from the VPC.
- The private subnets can access the internet through the Egress-only Internet Gateway.
Once your stack is created, the infrastructure is ready to receive your code. Go to the "Outputs" tab of the stack.
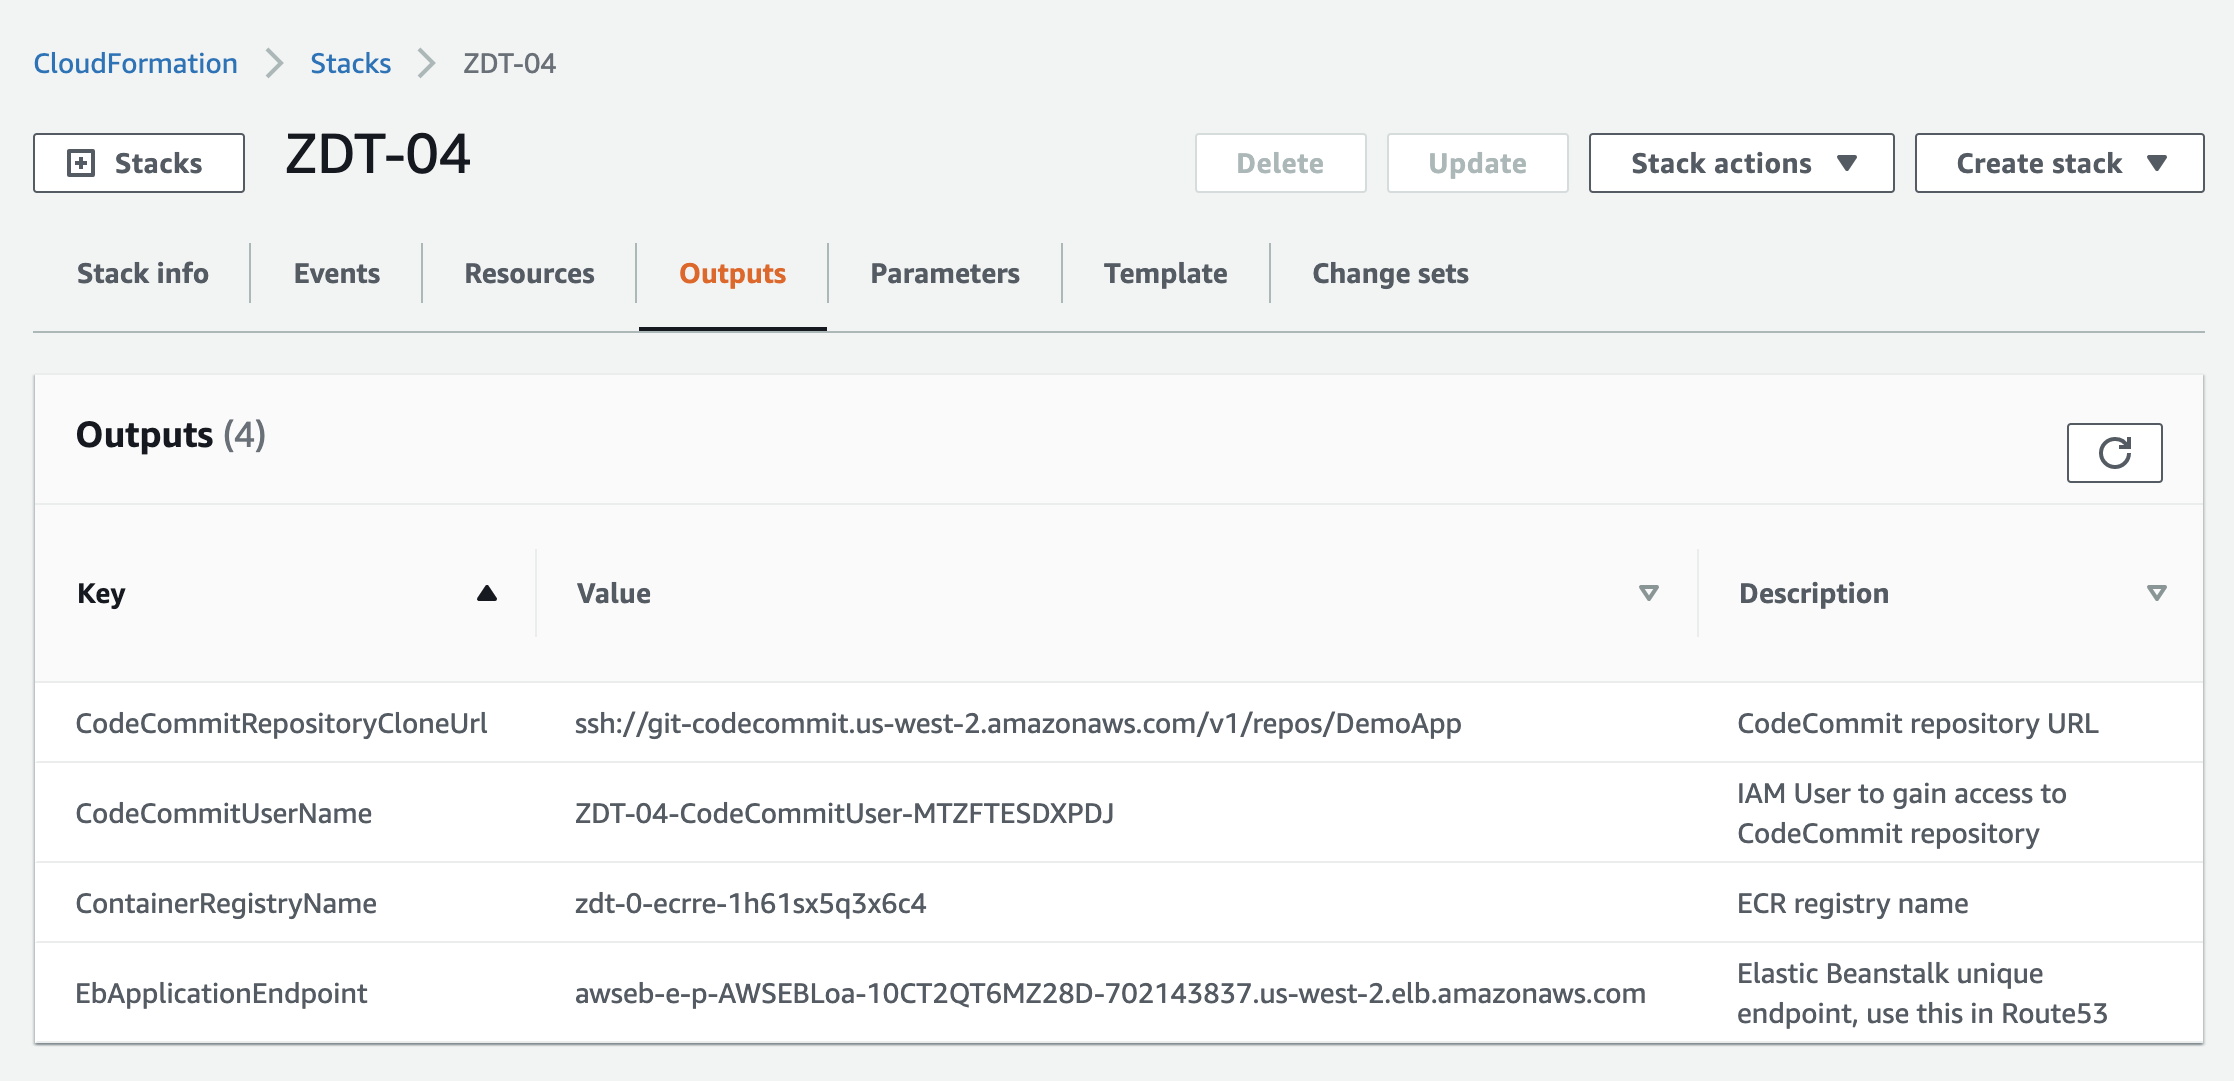
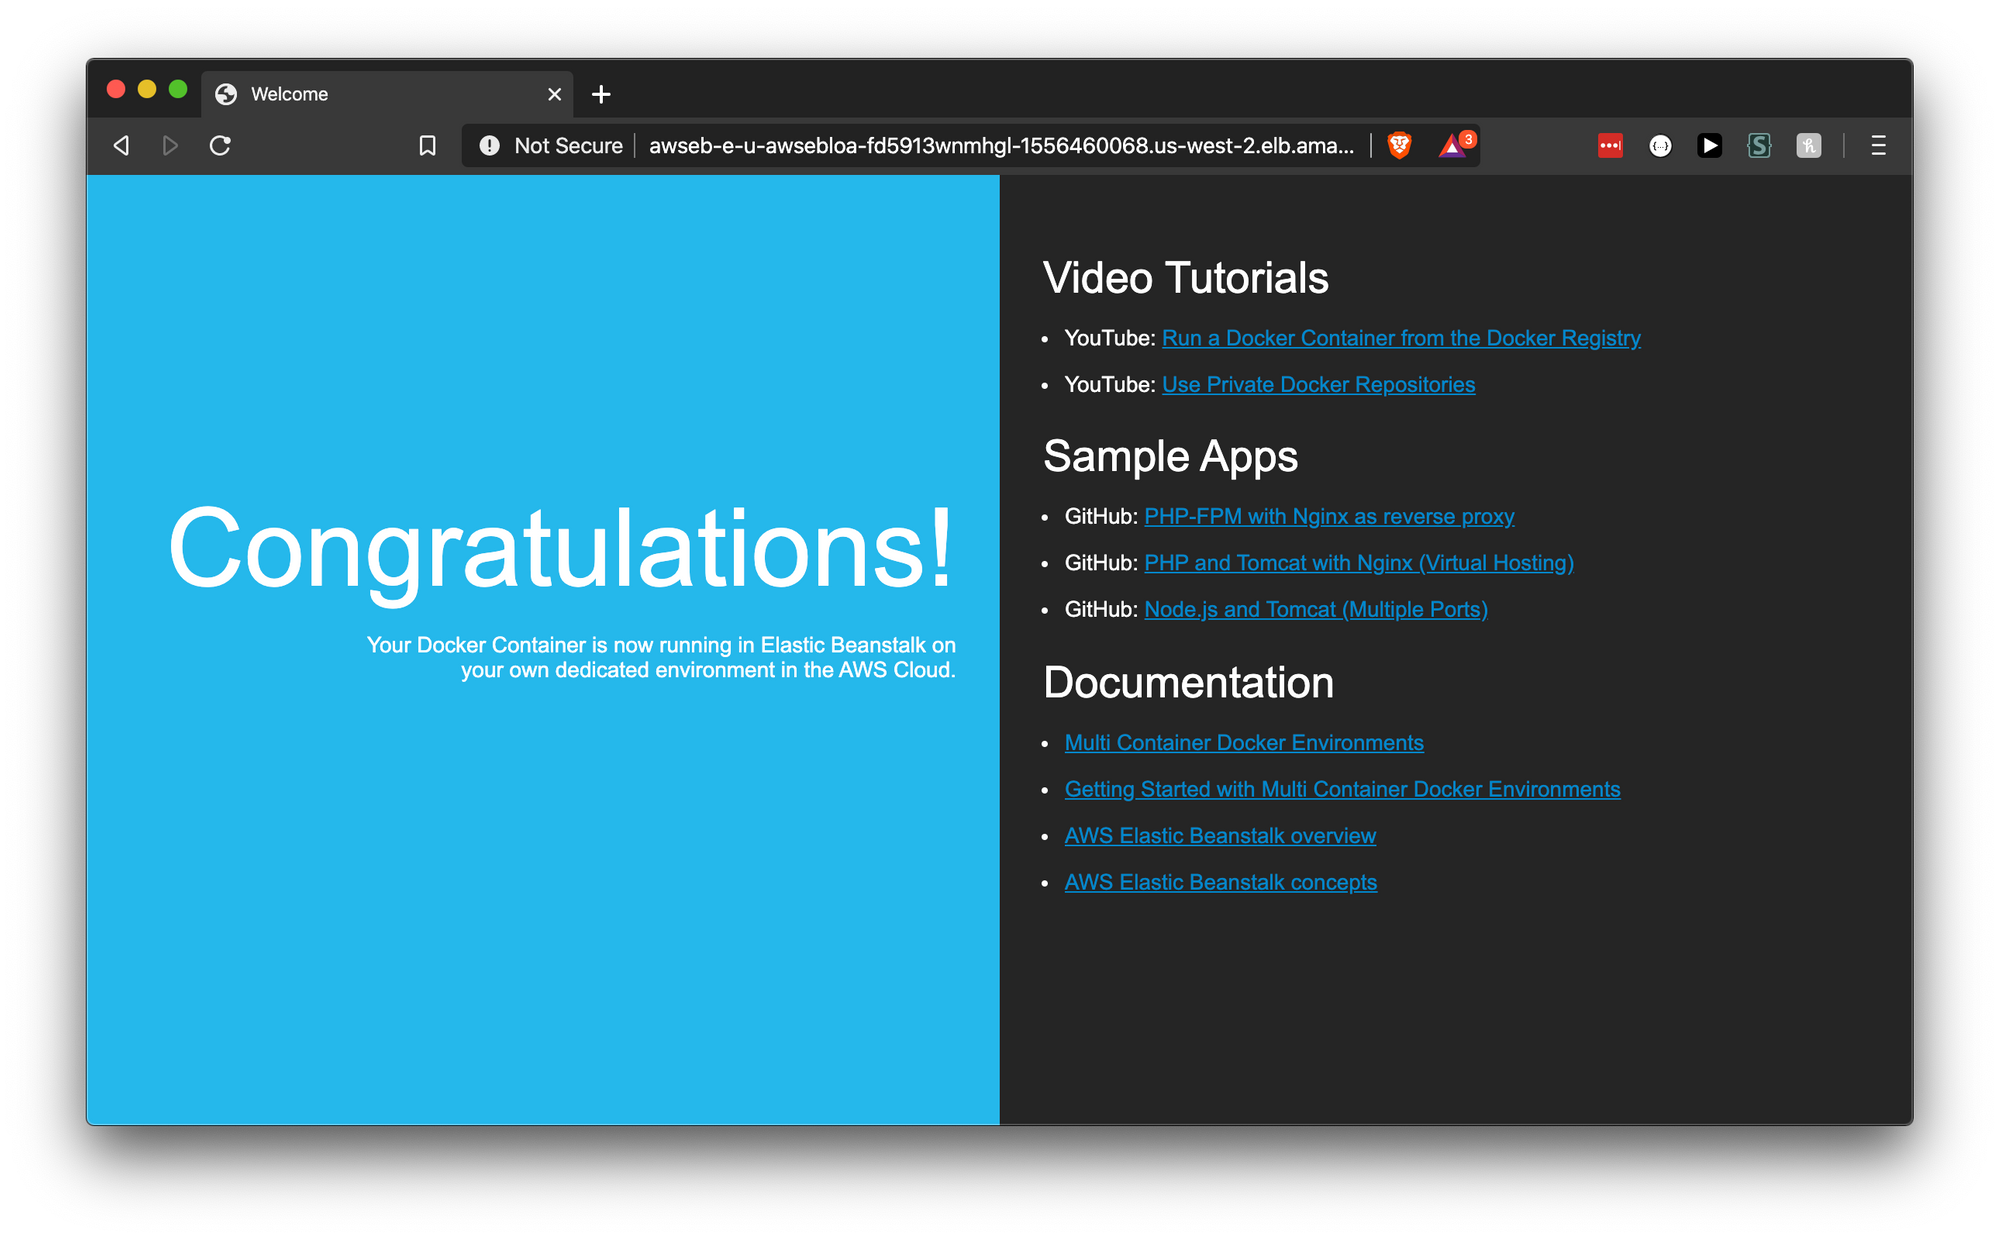
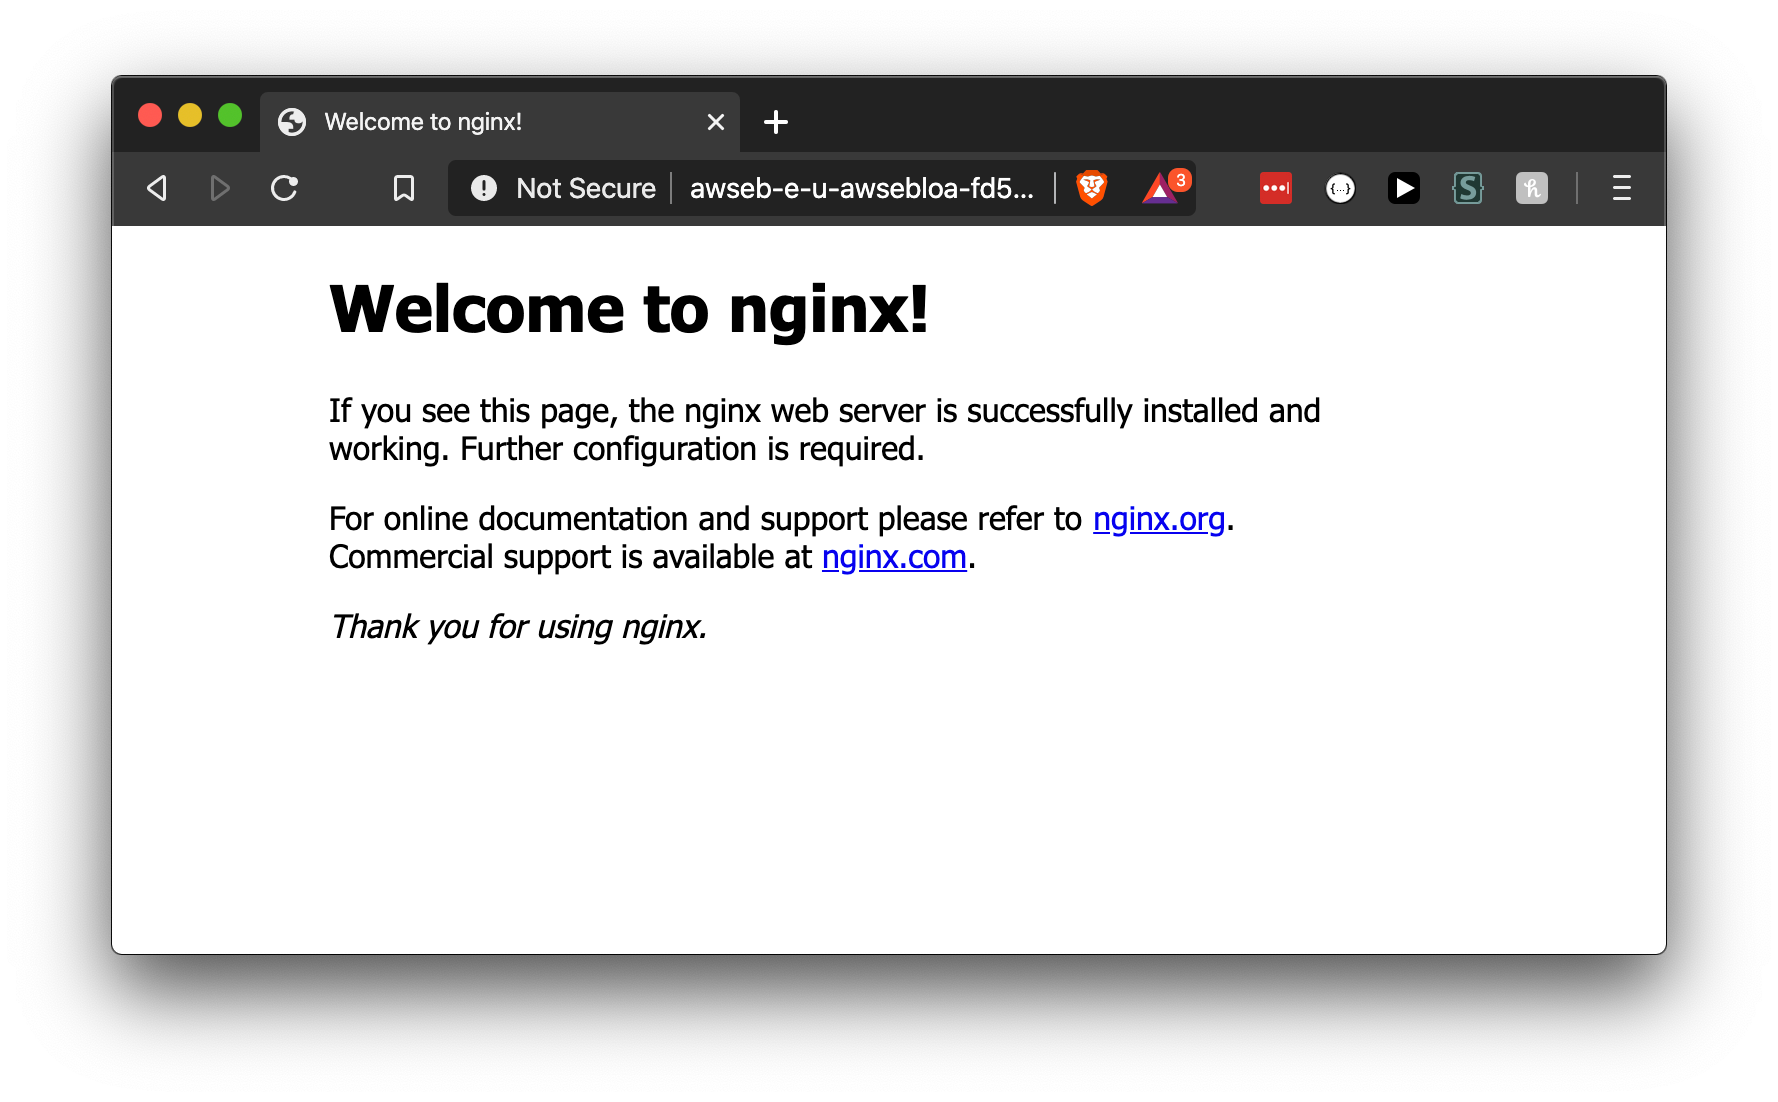
Open the EBApplicationEndpoint in your browser and you should see this:
Before you can push any changes to the CodeCommit repository, you have to configure the CodeCommit IAM User.
Configure CodeCommit SSH Access
You will need to generate an SSH key pair and upload the public key to the IAM user that was created for CodeCommit access.
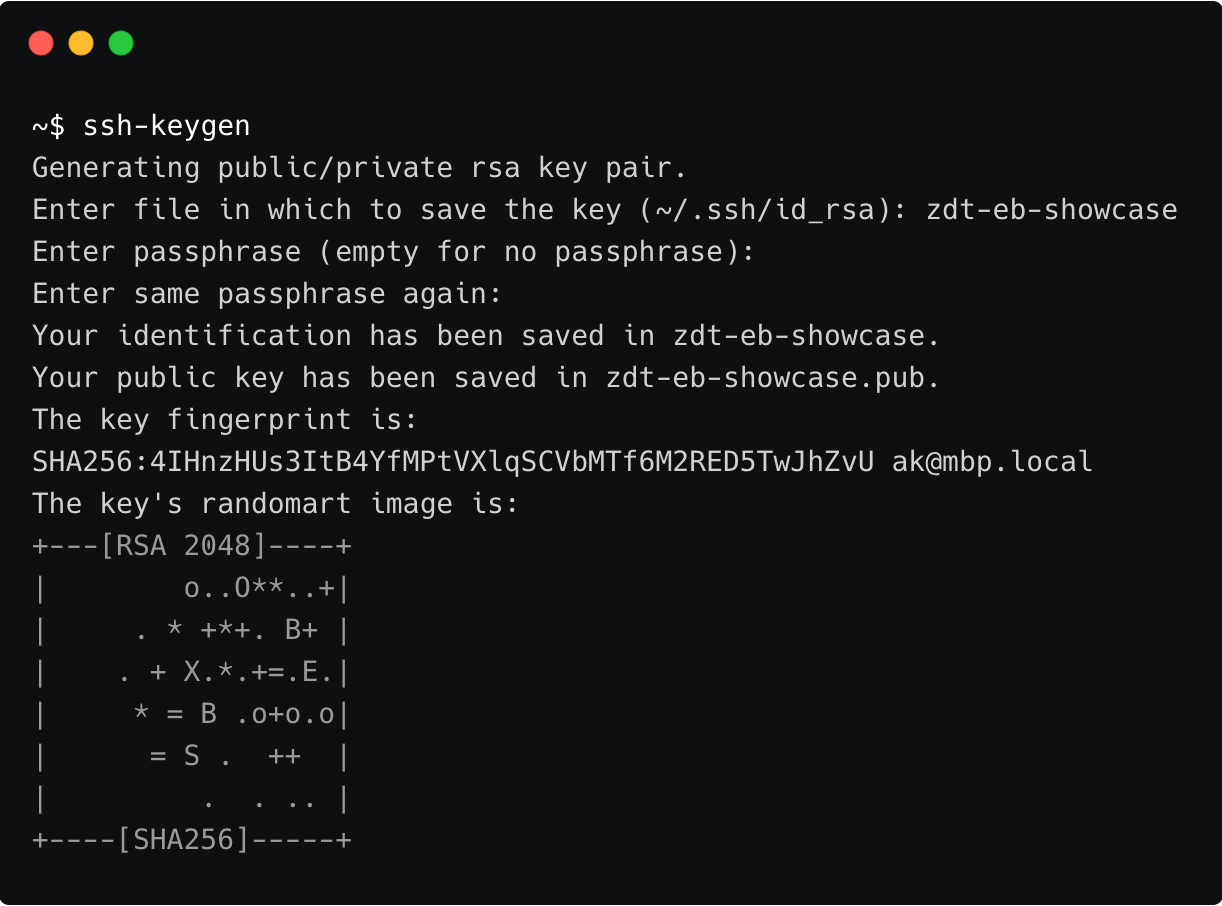
1) Create an SSH key pair if you don't already have one
Open a terminal and run: $ ssh-keygen
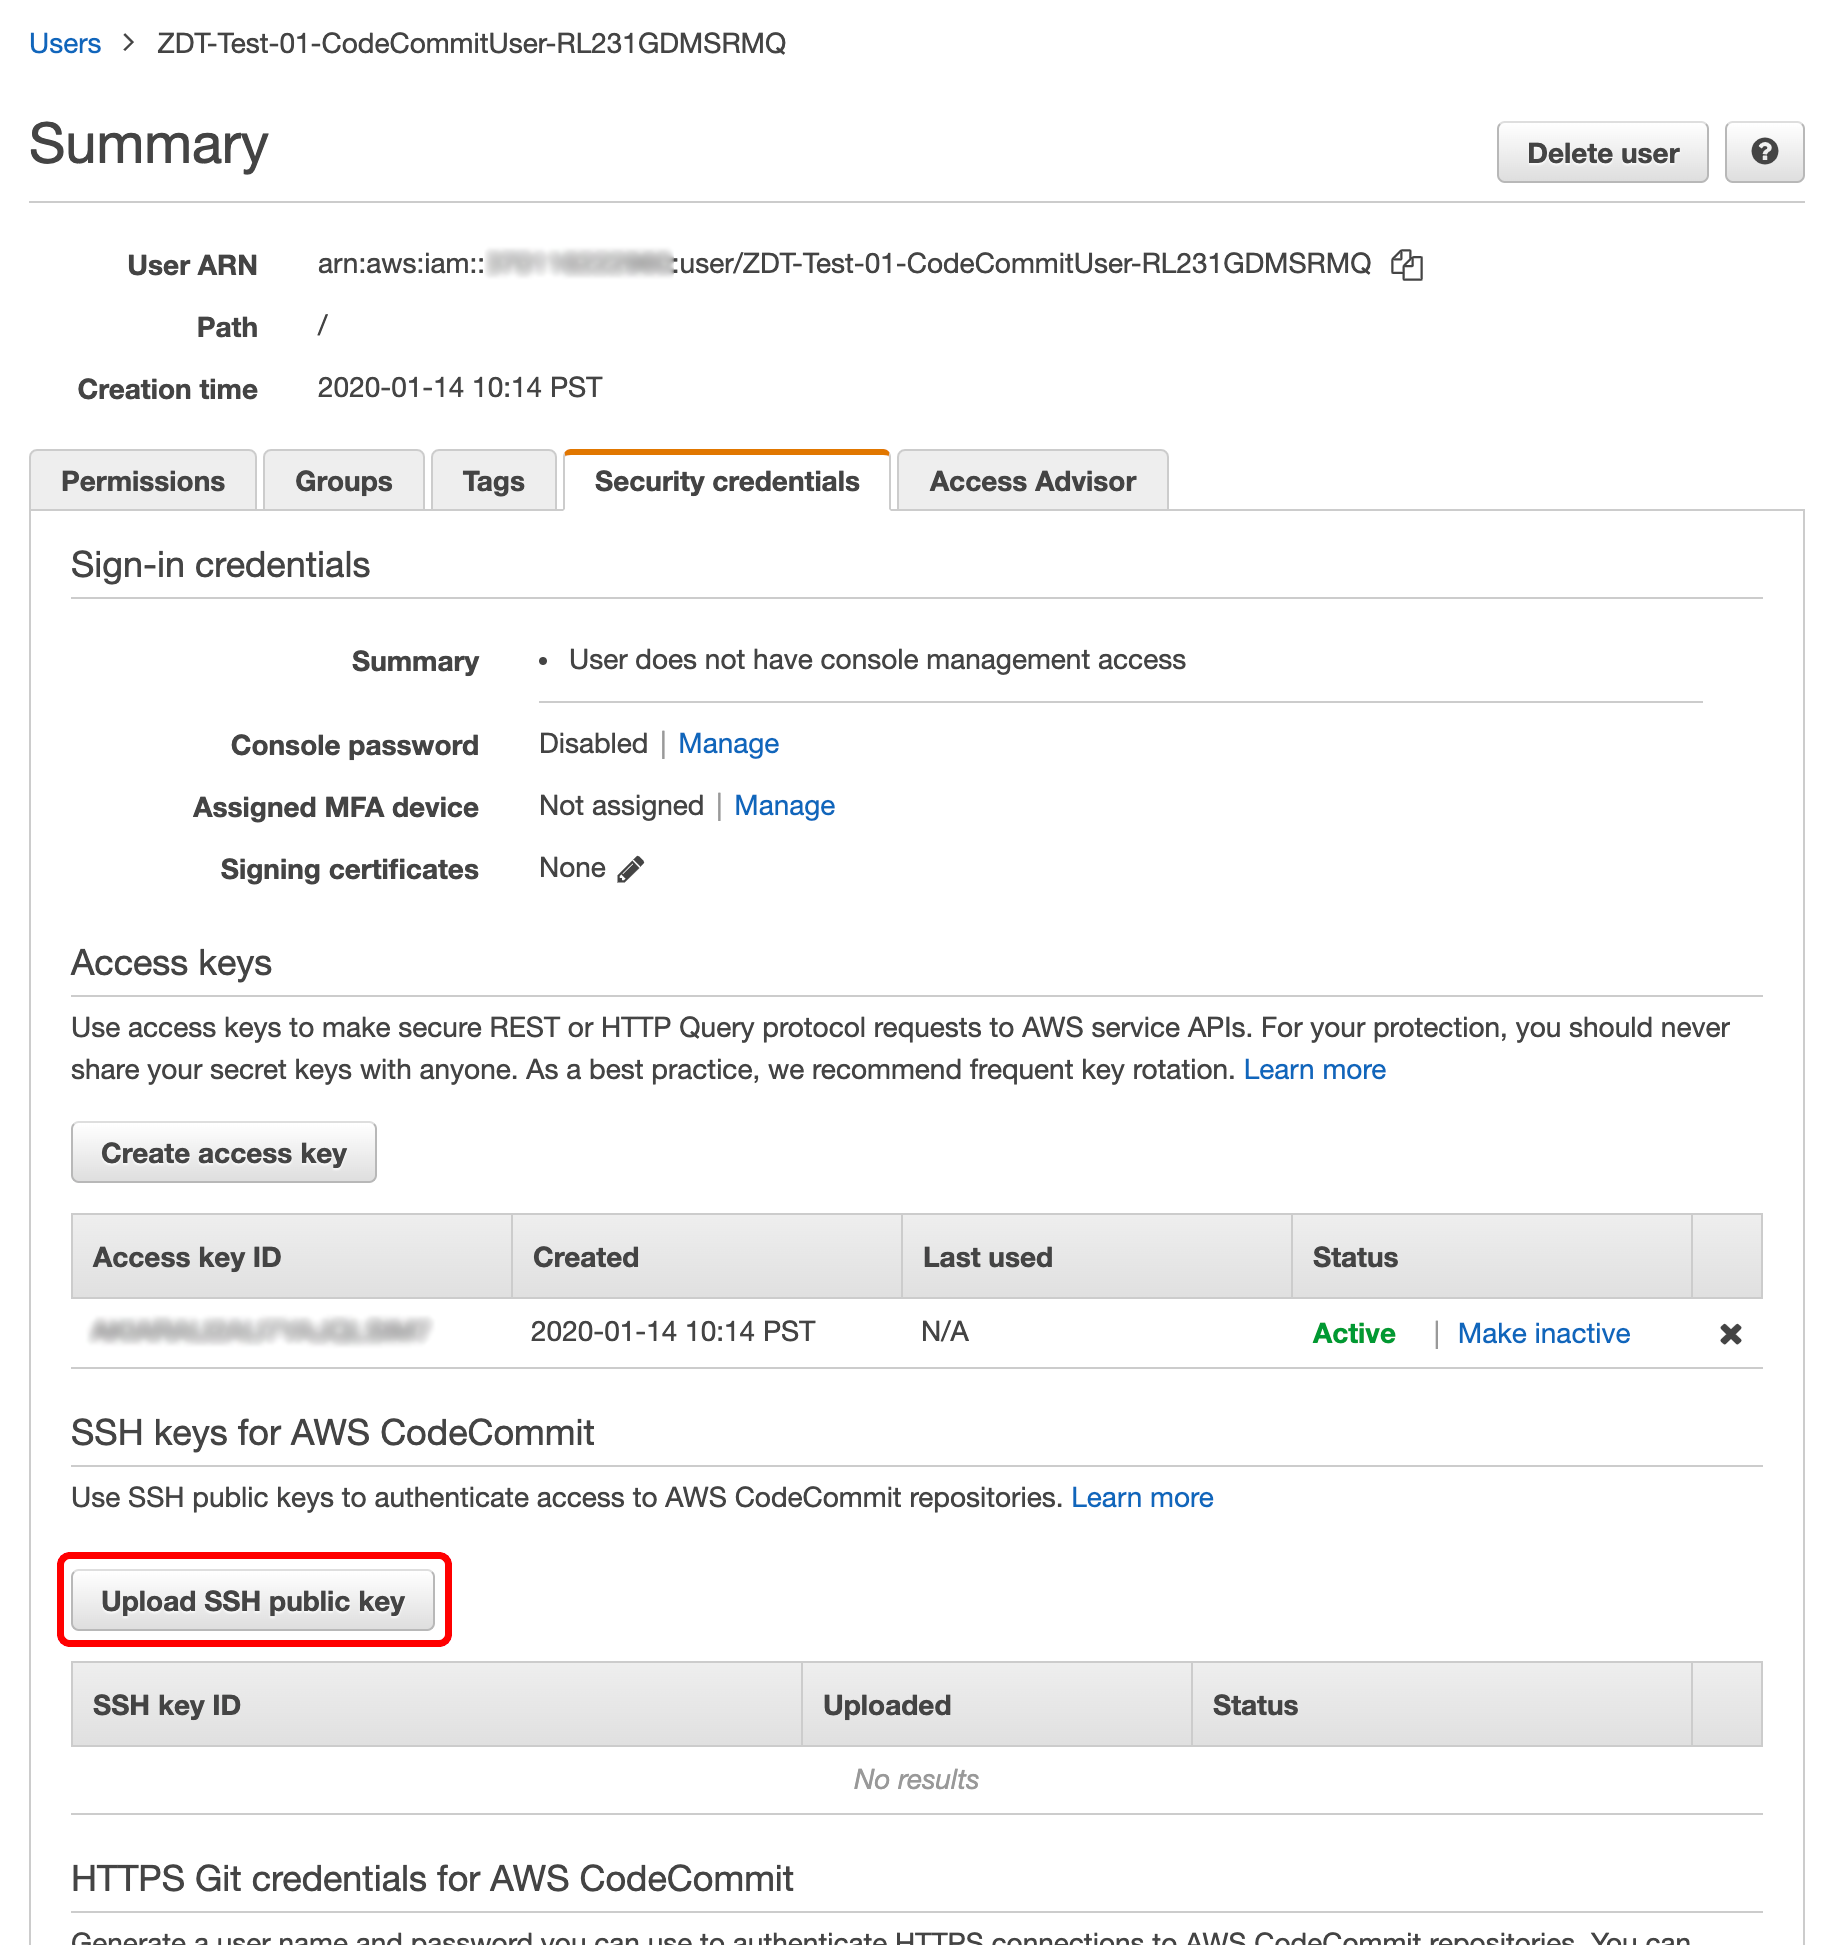
2) Upload the SSH Public Key to the IAM User
Go to the IAM dashboard and open the IAM user that was created, it should be something like {YOUR_STACK_NAME}-CodeCommitUser-ABC123. You can find it in the CloudFormation stack Outputs.
Click "Upload SSH public key" and paste the contents of your public key.
3) Update Your SSH Config
Add this entry to your ~/.ssh/config file:
Host git-codecommit*
  user APK*********N64P
  IdentityFile ~/.ssh/{NAME_OF_YOUR_PRIVATE_KEY}
- Replace the user key above with the CodeCommit user's
Access key ID - Replace the identify file above with the path to your CodeCommit private key
If the host definition above is too broad, for example if you have many CodeCommit repositories, replace the wildcard * with the complete URL to the repository.
Setup Git for Existing or New Project
If starting from an existing project:
git remote add origin ssh://git-codecommit.REGION.amazonaws.com/v1/repos/YOUR_REPO_NAMEIf starting a new project, clone the repo:
git clone origin ssh://git-codecommit.REGION.amazonaws.com/v1/repos/YOUR_REPO_NAMEConfigure CodeBuild
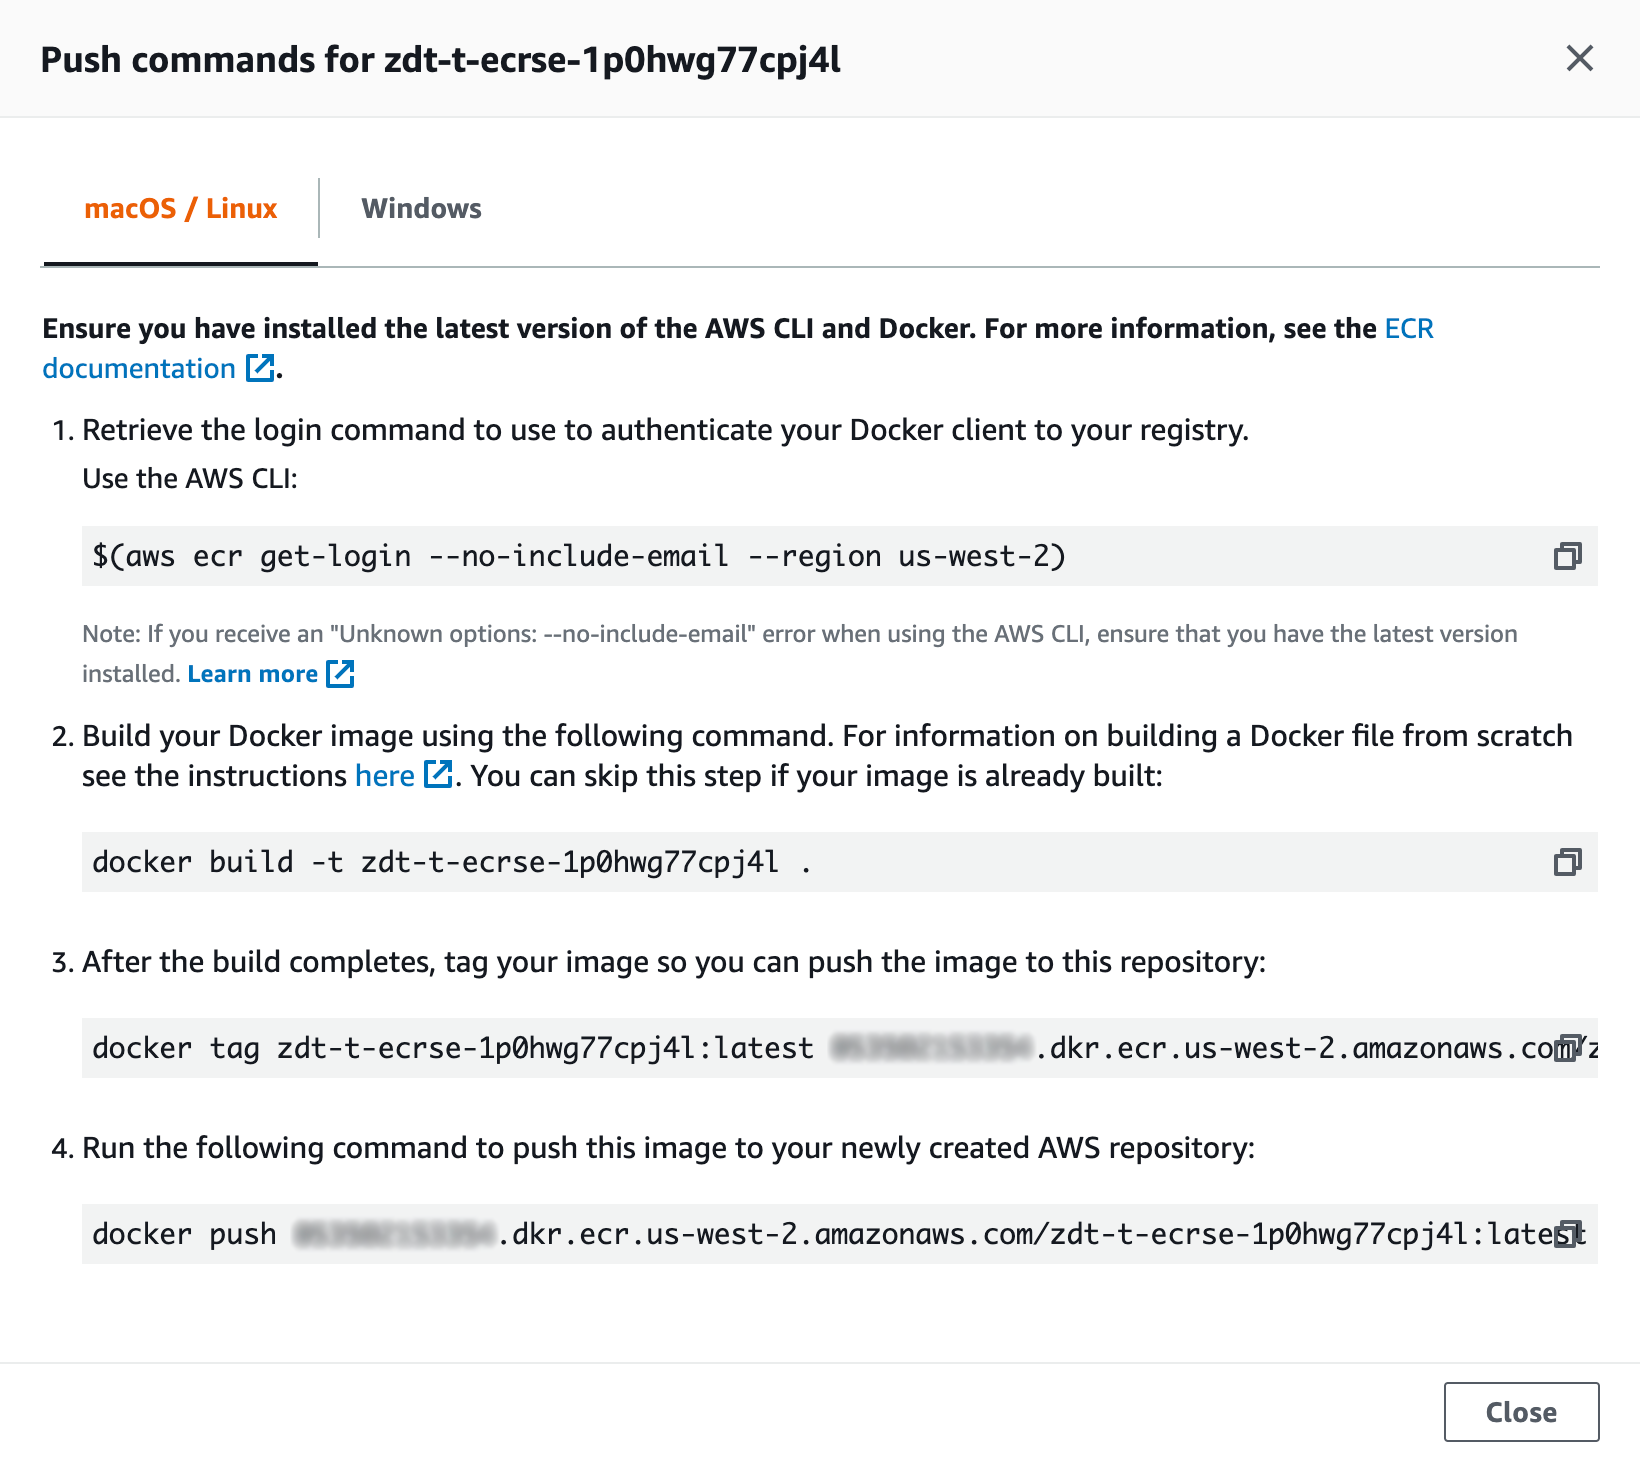
You will need to create a buildspec.yml file which CodeBuild will use to build your Docker image, tag and push it into Elastic Container Registry (ECR). A sample of mine is below, I basically copied the push commands from ECR:
The sample below does the following:
- Logs into Amazon ECR
- Builds and tags your docker container
- Pushes the container to ECR
version: 0.2

phases:
  pre_build:
    commands:
      - echo Logging in to Amazon ECR...
      - $(aws ecr get-login --region $AWS_DEFAULT_REGION)
  build:
    commands:
      - echo Running unit tests...
      - echo Build started on `date`
      - echo Building the Docker image...
      - docker build -t <YOUR_CONTAINER_REGISTRY_NAME> .
      - docker tag <YOUR_CONTAINER_REGISTRY_NAME>:$IMAGE_TAG $AWS_ACCOUNT_ID.dkr.ecr.$AWS_DEFAULT_REGION.amazonaws.com/<YOUR_CONTAINER_REGISTRY_NAME>:$IMAGE_TAG
  post_build:
    commands:
      - echo Build completed on `date`
      - echo Pushing the Docker image...
      - docker push $AWS_ACCOUNT_ID.dkr.ecr.$AWS_DEFAULT_REGION.amazonaws.com/<YOUR_CONTAINER_REGISTRY_NAME>:$IMAGE_TAG
artifacts:
  files:
    - '**/*'
  discard-paths: yes
Replace <YOUR_CONTAINER_REGISTRY_NAME> with your ECR name.
Refer to the Build Specification Reference for CodeBuild for more information on creating your buildspec.yml with more advanced configuration.
Configure Elastic Beanstalk to use ECS
Next you need to create a Dockerrun.aws.json file which defines the container name, image and container resource specifications. Refer to the Multicontainer Docker Configuration documentation for more information.
{
  "AWSEBDockerrunVersion": "2",
  "containerDefinitions": [
    {
      "name": "<YOUR_CONTAINER_REGISTRY_NAME>:latest",
      "image": "<YOUR_ACCOUNT_ID>.dkr.ecr.<REGION>.amazonaws.com/<YOUR_CONTAINER_REGISTRY_NAME>",
      "essential": true,
      "memory": 1024,
      "cpu": 1,
      "environment" : [
      ],
      "portMappings": [
        {
          "hostPort": 80,
          "containerPort": 80
        }
      ]
    }
  ]
}
Replace <YOUR_CONTAINER_REGISTRY_NAME> with the ECR name found under the CloudFormation stack Outputs. Replace <YOUR_ACCOUNT_ID with your AWS account ID. Replace <REGION> with the region in which you launched the CloudFormation stack.
Docker Container
In my example, I'm using a small nginx image just for testing.
https://github.com/nginxinc/docker-nginx/blob/master/mainline/buster/Dockerfile
Finally
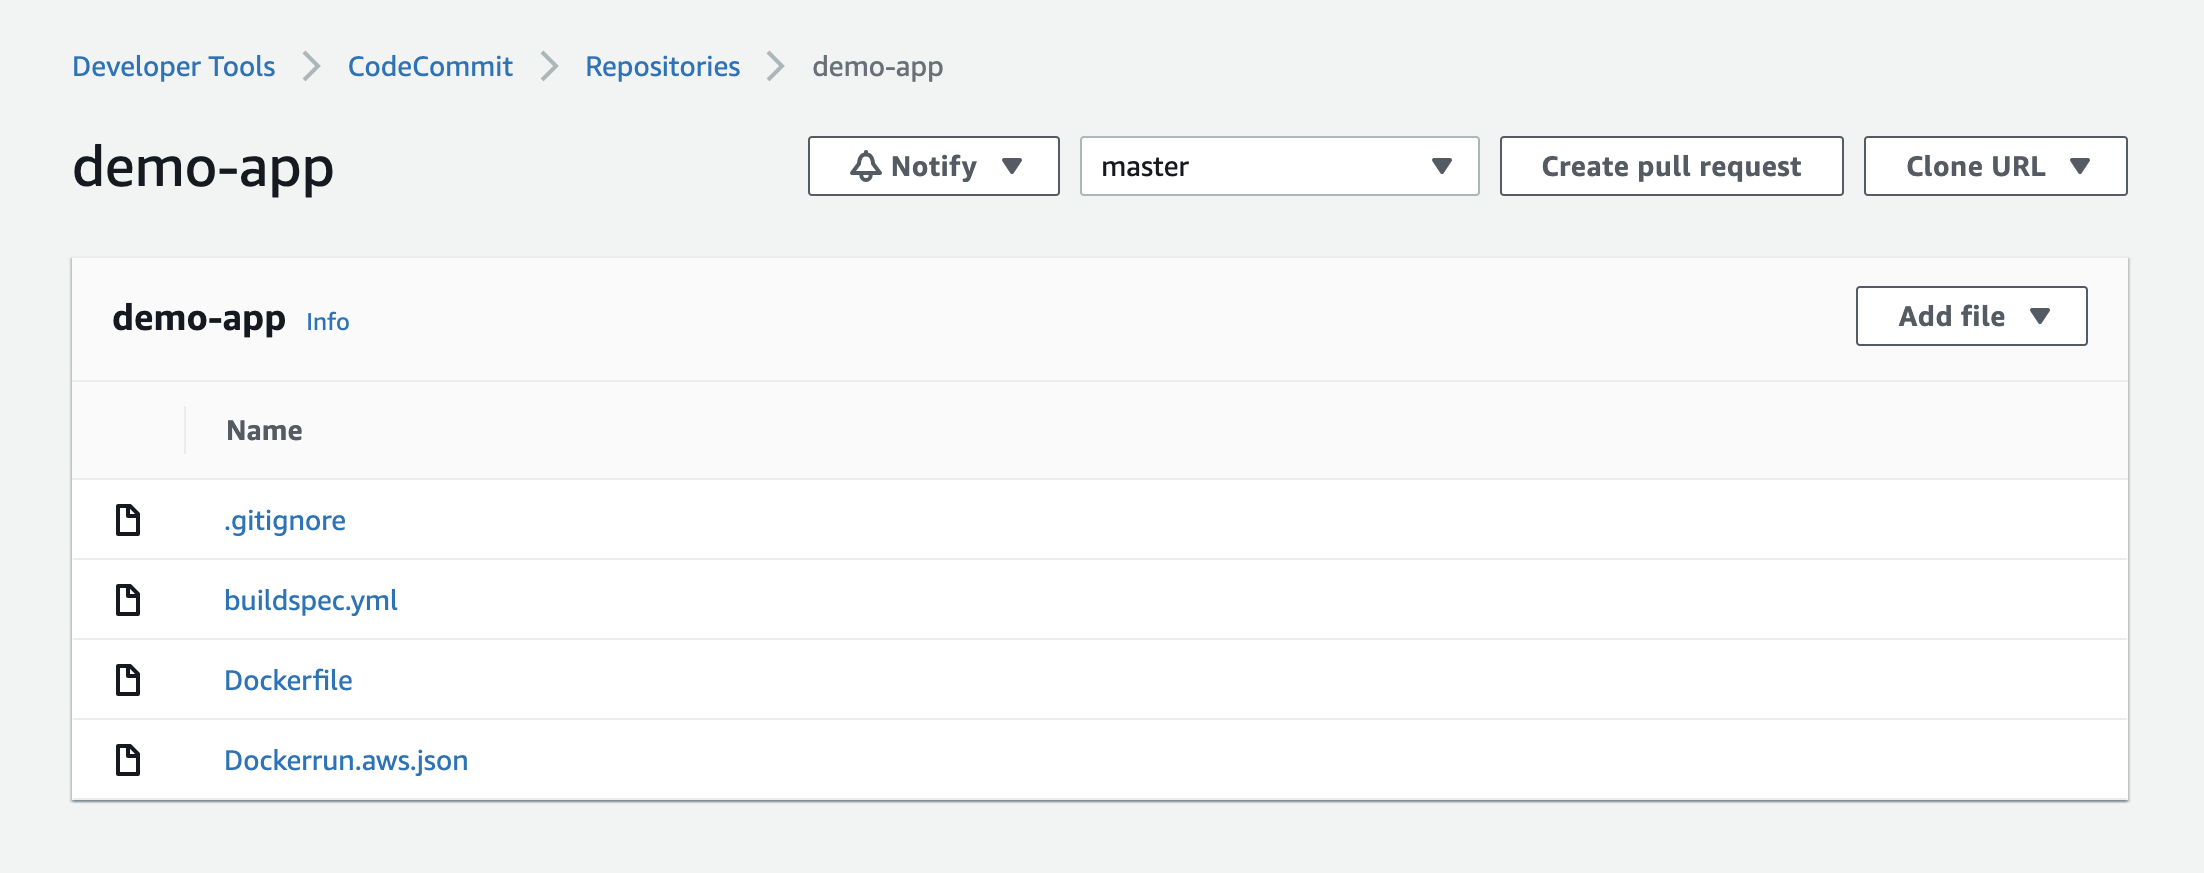
After you've created the buildspec.yml, Dockerrun.aws.json (and Dockerfile if this is a new project). These files should be in the top level of your application directory.
./buildspec.yml
./Dockerrun.aws.json
./Dockerfile
./myDemoApp
 ...
Then commit and push to your CodeCommit repository and CodePipeline will start the build and deploy process.
git add . && git commit -m 'My first commit... maybe.' && git pushRolling Deploy
Elastic Beanstalk carries out the deployment as follows (high level):
- Takes the first instance out of service
- Deploys new container version to the out-of-service instance
- Ensures the health check URL returns success on the new container
- Puts the new instance back into service if success or rolls-back if failed
- Repeats steps 1-4 for the second instance
When the deployment is done, navigate to the EB environment URL and you should see this:
Accessing the Database
The CloudFormation template configures Elastic Beanstalk to exposes the database host, port, name, username and password as environment variables in your containers.
RDS_HOSTNAMERDS_DB_NAMERDS_PORTRDS_USERNAMERDS_PASSWORD
Amazon Route53
Route53 isn't shown in this demo. When you're ready to point a domain to your application, create a CNAME record pointing to the application environment URL found under the CloudFormation stack Outputs.
Wrapping Up
Be mindful of the cost, you will have at least 3 instances running at all times, 2 for EB and 1 for RDS. If you delete the stack, be sure to backup the database as it will be deleted.
About Me
I'm a software engineer and hold a Masters degree in Mechanical and Aerospace Engineering from the University of California, Irvine. My broad background helps me adapt and stay passionate about finding pragmatic solutions to complicated problems. Let's chat ackhatib@gmail.com.